KillDisk Desktop and System Questions (FAQ)
How to create a request file for the license update?
How to apply a license update?
What types of disks are supported and NOT supported by KillDisk?
KillDisk Industrial supports all types of disks with standard sector size (512 or 4096 bytes):
- SATA I, SATA II, SATA III
- External USB 1.1, 2.0, 3.0, 3.1
- SAS (except 5-slot model)
- SSD
- U.2 NVMe (configurable)
- M.2 NVMe (configurable and via adapter)
- mSATA (via adapter)
- HDD 3.5", HDD 2.5" form factors
KillDisk Industrial does NOT support disks with non-standard sector size (ex. 520 bytes) being used by some hardware manufacturers (ex. NetApp). To be able to recognize and work with such types of disks, these disks must be converted to 512 sector size using third party tools (like SG3 on Linux).
How Fast Is Erasing?
An actual erase speed depends on many factors: Drive Speed, Drive Interface, Interface Controller, Computer overall performance and workload. Our tests give the results: 10 GB per minute (in average) per pass for HDD with decent computer configuration and disks with age of up to 5 years old. See detailed test results here.
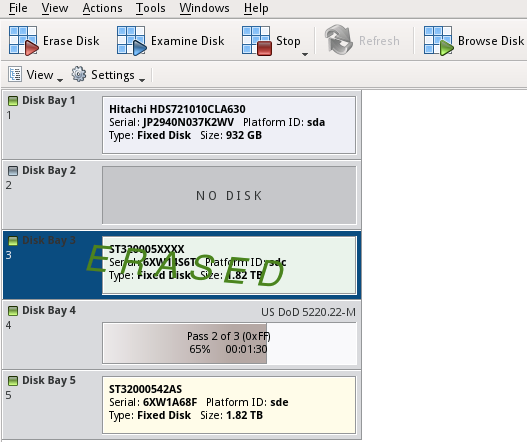
How to erase disks using Graphical User interface?
If you have connected peripheral devices (monitor, mouse, keyboard) to the KillDisk Desktop station, you are able to use the GUI to control KillDisk operations.
- Use mouse to select a disk or group of disks to be erased
- Click Erase Disk toolbar button, or execute Erase Disk from the context menu
- Set Erase method, any other options (if needed), and click OK to initiate the erase process
- A flashing green light on the disk bay LED indicates that an erasure is in progress
- You can cancel the process by clicking Stop on toolbar
- Wait until the process is complete
- A solid red light will indicate that disk has been erased successfully
How to switch to Touch Mode (Kiosk Mode) operations and back?
KillDisk can operate in industrial environments using compact touch screen monitors.
To switch to the compact Touch Mode you can either:
- Click Touch Mode (or Kiosk Mode) from View menu or
- Click Touch Mode toolbar button or
- Press Ctrl+T key combination
To switch back to full-screen:
- Press Ctrl+T key combination or
- Touch menu button at bottom-left corner and then touch Display button (the second button at right side)
How to fix monitor resolution?
For some HDMI monitors (16:10 mostly) there are problems displaying application.
To solve the problem the possible solutions could be:
- Use the monitor built-in menu to setup 16:9 or other resolution
- Use HDMI-to-DVI or HDMI-to-VGA connectors instead of direct HDMI-to-HDMI cable
- Try other monitors
How to erase IDE disks?
You might be able to erase IDE disks using IDE to SATA or IDE to USB adapters. We however do not supply such adapters, you will need to look for them by yourself.
Another option is to use a legacy PC supporting IDE connectors and install a fresh copy of KillDisk Industrial Windows/Linux (we can provide you with 50% discount) and erase IDE disks there.
How to choose a path to store erase certificates?
- Open KillDisk Industrial System Preferences/Disk Label Presets/Save to PDF
- Enter your new path onto Save certificate as PDF to field
See more details in the documentation:
https://www.killdisk-industrial.com/desktop-manual/index.html#certificates-options.html
I would like to copy the PDF certificates to an USB drive but I cannot access the folder where KillDisk stores the certificates
- Open PCManFM-Qt File manager
- Choose Computer/File system destination
- Press Tool/Open as Root in Main Menu
- Enter root password (by default password is 1111)
- In context menu in file display area select Show Hidden
- Open certificates location
- Select and copy your certificates
How to save labеls as PDFs?
- Install a PDF printer driver
- Open KillDisk Industrial **System Preferences/Disk Label Presets **
- Choose PDF printer as a default printer for labels
- Files with labels will be stored in /home/istar410/PDF directory by default
How to install PDF printer driver via CUPS?
- Open terminal by pressing CTRL + ALT + T
- Enter sudo apt install printer-driver-cups-pdf and press Enter
- Driver should be installed
If you have an error dpkg was interrupted, open a terminal and enter dpkg --configure -a command. After that install the driver again.
How to erase disks in a RAID controller?
If hard disks are part of a RAID (software or hardware), they are not visible in the system on their own but are presented as part of a virtual disk which can be erased as a whole. If there is a need to erase individual disks, they must be taken out from RAID configuration.
For software RAID (like Microsoft Storage volumes) a RAID should be broken, all individual disks from the RAID will become individually visible and accessible for erase.
For hardware RAID (configured on RAID controller) disks must be physically taken out from the RAID controller and connected to the system directly in order to become accessible as individual disks.