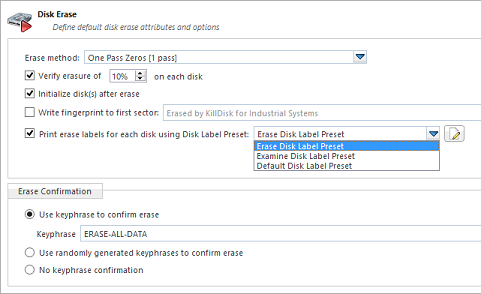
Disk Erase
The Disk Erase section provides settings' configuration for the KillDisk erase procedures.
The same erase options for each batch could be set through Batch Editor dialog.

- Erase method
- Choose one of more than 20 sanitizing methods including many international standards and custom patterns.
- Erase verification
- Percentage of disk to be verified after disk erasure. The large percentage, the more time it takes to verify written data.Note:
In some erase methods such as the US DoD 5220.22-M this option is mandatory. After the erase operation has completed this feature will scan the entire drive evenly and verify the integrity of the erase operation. This option is the percent of the sectors to check across the disk. Most standards specify 10% as an accurate sample size for the verification.
- Initialize disk(s) after erase
- Writes proper MBR to disk's first sector after erasure complete. This is needed for disk to be visible and accessible by most Operating Systems.
- Write fingerprint to first sector
- This feature writes the specified fingerprint to the first sector of the erased drive. If erased disk is plugged into the system and system boots from this disk the user will see a message on the screen about the disk being erased by KillDisk.
- Print erase labels
- This feature prints erase label automatically after erase completion using specific Disk Label configuration.
- Erase confirmation
- As a safety precaution to prevent accidental removal of disks' data KillDisk uses the user-typed keyphrase mechanism just before the erase procedure is initiated (see below). By default this precaution mechanism is initialized with the key phrase ERASE-ALL-DATA. The key phrase can be modified, configured as a randomly generated set of characters or disabled. The keyphrase should be typed correctly in order to start the erase procedure.